
by Annie | Mar 30, 2011 | Game Design
Creating a full game for the first time no doubt brings about surprises. But one surprise I didn’t expect was having to dig up the little high school trigonometry knowledge I’d long ago buried in the deep recesses of my brain. So dust off the cobwebs and come along for the ride. Here’s your daily dose of vector math. Aim Assist Ball In the process of designing ball powerups for our game, we decided to add an aim assist ball that would show players the trajectory of the ball, as well as the first deflection, allowing players to line up their shots more accurately for long shots. The task of programming this nifty little powerup fell to me. Ball Physics To start, I looked at the ball physics of classics like Pong and Arkanoid, analyzing the angles of deflection and trying to figure out the patterns. Soon, it was time to get out the graph paper and start plotting points. In order to show the trajectory, I would need to know the initial angle the ball was aimed. In order to figure out the angle of deflection, I would need to figure out the orientation of the surface the ball would hit, as well as the angle of the collision. After plugging and chugging several sets of numbers and angles, I finally realized the common thread. So for those of you still hoping to create a Pong game of your own, here’s the anatomy of ball deflection. Hit Normal First and foremost, we need to figure out the orientation of the surface the ball hits. Is the surface vertical, horizontal,...

by Annie | Mar 22, 2011 | Game Design
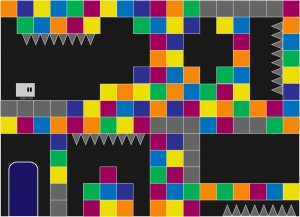
As we’re starting to create levels in Unity, we’re discovering that making 2D levels in a 3D environment is no walk in the park. Luckily, we’ve discovered UniTile, an easy to use yet powerful tile-based 2D map editor for Unity. If you’re interested, you should definitely check out the UniTile demonstration video to glimpse some of its capabilities. UniTile allows us to “paint” levels into Unity, then immediately jump into them to test them out, decreasing our level building time by several hours. If you’ve decided that UniTile is appropriate for your project, here are a few simple steps for setting up and getting started. Installing UniTile UniTile comes as a Unity package, so you can just import the package into any existing project. Once you’ve saved the package on your computer, open your Unity project, then go to Assets > Import Package and browse to find the UniTile package. Creating Textures Before setting up UniTile in a new scene, you’ll need a texture that holds the pieces you want to use in your level. I create my textures in Adobe Illustrator, then export them as PNGs. Importing Textures You can then import the texture into your project. To do this, right-click in the Project window and go to Import New Asset, then find your texture. After importing, I modify the following settings for my textures: Filter Mode: Trilinear Texture Type: Advanced Generate Mip Maps: Disable Creating Materials After importing the texture, create a new material. To do this, right-click in the Project window and go to Create > Material. Drag your texture onto the material and adjust the material settings. For...

by Annie | Mar 15, 2011 | Game Design, Illustration Station
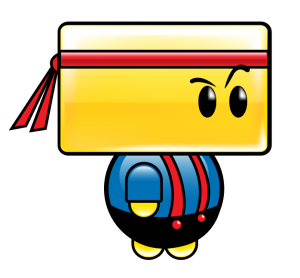
I am by no means a character designer. Throughout my patchy art and design background, I’ve always shied away from designing characters. Landscapes, fanciful illustrations, and fonts – those I can do. Characters? Nuh-uh. To me, designing characters is the hardest type of design. Breathing life into a being created through imagination takes both skill and courage. That’s why when it came time to design the main character for our game, I tried to pass the task off to anyone and everyone. I didn’t want to shoulder the responsibility because I didn’t think I was capable of creating a likable, memorable, and functional character. What followed were weeks of ups and downs. Frustration, excitement, spurts of creativity, anxiety, and lots of iteration. When designing Chip, we prioritized three things: cuteness, functionality, and memorability. First and foremost, he had to have a blocky head which could pivot to deflect balls. To speak to the intuitiveness and simplicity of our mechanics and gameplay, we also designed Chip using basic shapes and primary colors. No character is perfect, but I think we’re finally at a point where we’re all satisfied with Chip’s design. Chip’s colors are warm and approachable, and his form communicates function. And thus, we’re finally ready to unveil the making of...
by Annie | Mar 11, 2011 | Game Design
We’re nearing the end of the second week of production, and every day brings more exciting new design challenges. Adrenaline and stress levels are running high as we continue to crank through 12-hour days on coffee and instant noodles. Because we’re so close to our game, constantly nitpicking over every gameplay detail and art asset, it’s sometimes difficult to see the bigger picture. So many variables are up in the air, and we have the awesome yet often terrifying opportunity and responsibility to craft this concept into a fun and memorable game. And that’s why zooming out is so important. Twice a week, instructors and industry mentors come in to check on our progress and offer invaluable guidance, allowing us to take a step back and evaluate our game, to see it for its triumphs and challenges, and to ensure that our efforts and decisions are in line with the vision and goals of our game. To all our instructors and mentors, thank you, thank you, thank you. Your honesty and advice continually push us to new heights as designers. Our game is already infinitely better than it could’ve been without...
by Annie | Mar 9, 2011 | Game Design, Illustration Station
Creating art that effectively communicates gameplay is hard. Not only must functionality and aesthetics work hand in hand, but the visual style must be strong enough to withstand round after round of iteration on game mechanics. Early in preproduction, we knew we had a strong mechanic: a character that throws balls and deflects them with his head to break blocks. However, everyone on the team and everyone we pitched the concept to imagined the game differently. Thus, the art went through several iterations to get to its current state, and certain aspects of the visual style are still undergoing further iteration. One of the earliest art mockups consisted of a small blockheaded character surrounded by blocks and environmental hazards on a single screen. We soon realized that our character needed to communicate more movement, and that perhaps gameplay would extend beyond a single screen. With this mockup, we started to get a sense of the environment around the gameplay. After some experimentation, we created a more whimsical concept, this time with a bolder look and a more memorable character. After further discussions on art and gameplay, we settled on a construction theme, providing more cohesion amongst the elements of the environment. Our current art style aims to communicate both gameplay and function through bold visuals and purposeful design with careful consideration in guiding the player experience. As the mechanics undergo further iteration and tweaking, the art will surely receive further iteration and polish as well. However, by going through multiple rounds of iteration on the visuals and continually going back to the drawing board to push strong visual communication, we’ve...