by Annie | Game Design
Remember these logic puzzles? You’re given a brief story and a few seemingly unhelpful hints (e.g., Wanda’s partner doesn’t like roses), and then you have to proceed through the hints, crossing off the non-solutions until you arrive at the solution. Lately, I feel like I’ve been working through a logic puzzle, only in script. At first, implementing Chip’s animations seemed easy. We only had five animations: walk, jump, throw a ball, hang by his chin, and die. Sounds easy enough, right? That’s what I thought too. Very quickly, I realized that these animations weren’t mutually exclusive. Chip might jump and throw at the same time, making for a very twitchy looking Chip. Back at the animation boards, we knew we had to separate out Chip’s body parts in order to run simultaneous animations. But which body parts? And from which animations? Here comes the logic puzzle. Regardless of what Chip’s doing (walking, jumping, etc.), if he throws a ball, the throw animation should play. So first and foremost, his arm needed to be a separate piece. Next came the more nitty gritty. When Chip is jumping, even though he’s also moving forward, he’s no longer walking. Similarly, when chin hanging, even with forward inputs, Chip should not be walking. And above all, if Chip is dying, he shouldn’t be doing anything else. After a few days piecing it all together, Chip has come alive and is now quite...
by Annie | Game Design
The more I get into game design, the more pleasantly surprised I am at how much psychology is involved. If you think about it, game designers shape experiences, so they must constantly dig into their toolbox of psychological principles. If you’ve ever played a game and striven to attain any of its achievements (think Angry Birds), the game designers have hooked you in with psychology. Achievements, like visual feedback, audio, and various missions and challenges, play a huge part in the perceived fun and replayability of a game by motivating players. To learn more, take a look at this article on how to design effective game achievements: The Cake Is Not a Lie: How to Design Effective...
by Annie | Game Design
When deciding between using Unity or UDK as our game engine of choice, one of my main qualms was with the error messages Unity throws at you. Whereas UDK will let you jump in the game with multiple kismet errors, Unity spits out lists of errors, refusing to let you run the game before fixing them all. There are entire forums out there dedicated to dealing with various programming error messages. And as a novice programmer, this scared the heck out of me. How was I supposed to know what was wrong without seeing what my code did? However, after weeks of braving the sea of error messages, I’m happy to say that I find them quite helpful. Most of the time. In fact, I even have a few favorites: 1. Error CS8025: Parsing error This is hands-down my favorite. Easiest to fix, yet one of the most annoying. This error usually refers to a misplaced curly brace. Spend a few seconds visually pairing up all the curly braces, and this error is soon out of your hair. 2. Error CS1525: Unexpected symbol ‘{‘ This one is another fun syntax error, usually thrown out as a result of not pairing all the parentheses in conditionals. In programming, most things need partners. 3. Error CS0029: Cannot implicitly convert type ‘int’ to ‘bool’ There are several variations on this error, which usually results from syntax error in the conditional. Most of the time, I get this error when I forget to include double equal signs in my conditionals (e.g., ‘if (iLevel = 1)’ rather than ‘if (iLevel ==1)’), so the statement...
by Annie | Game Design, Illustration Station
To say I’ve learned a lot about scripting over the past several weeks is an understatement. I’ve gone from struggling to create basic character movement to creating functions that can “think” on their own. But most of all, I’ve learned that programming is not just about working hard, but more importantly, about working smart. One of my recent tasks has been to design and implement a level select map. After plotting the levels on the map, my first instinct was to script the individual events for each level. So, for example, if level 3 was just completed, the spotlight for the next level would need to go on the level 4 marker. If Chip is on the raft between levels 3 and 4, he can go to the right for level 4, get back on the raft and go left for the bonus level, or get on the raft and go up to get back to level 3. But he would not be able to go past level 4. As you can imagine, the list of conditionals and events needed for each spot quickly grew quite lengthy. The solution? Work smart. I stepped back and analyzed the commonalities amongst the different stopping points on the map. Chip would need to stop at level markers, but also rafts and corners as well. But he would only be able to launch into a level while currently standing on a level marker. As the patterns started to emerge, I was able to formulate functions and algorithms so the code would work for me, rather than the other way around. It didn’t come without...
by Annie | Game Design, Logoland
Logos have long been one of my favorite parts of graphic design. A logo needs to be simple and straightforward while simultaneously communicating layers of meaning. When designing a logo, I first think long and hard about what I want the image to communicate, filling the pages of my sketchbook with words and doodles. Color choice, typography, style, and spacing all play important roles and can drastically change the look and feel of a logo. In designing the logo for our current game Blokhead, I wanted to create a bright and strong logo that would communicate the main mechanic of throwing and deflecting balls. I wanted the logo to communicate both action and fun. The result is a logo comprised of primary colors and thick blocky letters that incorporate the L and O of Blokhead into an image of a bouncing ball. Simple, functional,...
by Annie | Game Design
Creating a full game for the first time no doubt brings about surprises. But one surprise I didn’t expect was having to dig up the little high school trigonometry knowledge I’d long ago buried in the deep recesses of my brain. So dust off the cobwebs and come along for the ride. Here’s your daily dose of vector math. Aim Assist Ball In the process of designing ball powerups for our game, we decided to add an aim assist ball that would show players the trajectory of the ball, as well as the first deflection, allowing players to line up their shots more accurately for long shots. The task of programming this nifty little powerup fell to me. Ball Physics To start, I looked at the ball physics of classics like Pong and Arkanoid, analyzing the angles of deflection and trying to figure out the patterns. Soon, it was time to get out the graph paper and start plotting points. In order to show the trajectory, I would need to know the initial angle the ball was aimed. In order to figure out the angle of deflection, I would need to figure out the orientation of the surface the ball would hit, as well as the angle of the collision. After plugging and chugging several sets of numbers and angles, I finally realized the common thread. So for those of you still hoping to create a Pong game of your own, here’s the anatomy of ball deflection. Hit Normal First and foremost, we need to figure out the orientation of the surface the ball hits. Is the surface vertical, horizontal,...
by Annie | Game Design
As we’re starting to create levels in Unity, we’re discovering that making 2D levels in a 3D environment is no walk in the park. Luckily, we’ve discovered UniTile, an easy to use yet powerful tile-based 2D map editor for Unity. If you’re interested, you should definitely check out the UniTile demonstration video to glimpse some of its capabilities. UniTile allows us to “paint” levels into Unity, then immediately jump into them to test them out, decreasing our level building time by several hours. If you’ve decided that UniTile is appropriate for your project, here are a few simple steps for setting up and getting started. Installing UniTile UniTile comes as a Unity package, so you can just import the package into any existing project. Once you’ve saved the package on your computer, open your Unity project, then go to Assets > Import Package and browse to find the UniTile package. Creating Textures Before setting up UniTile in a new scene, you’ll need a texture that holds the pieces you want to use in your level. I create my textures in Adobe Illustrator, then export them as PNGs. Importing Textures You can then import the texture into your project. To do this, right-click in the Project window and go to Import New Asset, then find your texture. After importing, I modify the following settings for my textures: Filter Mode: Trilinear Texture Type: Advanced Generate Mip Maps: Disable Creating Materials After importing the texture, create a new material. To do this, right-click in the Project window and go to Create > Material. Drag your texture onto the material and adjust the material settings. For...
by Annie | Game Design, Illustration Station
I am by no means a character designer. Throughout my patchy art and design background, I’ve always shied away from designing characters. Landscapes, fanciful illustrations, and fonts – those I can do. Characters? Nuh-uh. To me, designing characters is the hardest type of design. Breathing life into a being created through imagination takes both skill and courage. That’s why when it came time to design the main character for our game, I tried to pass the task off to anyone and everyone. I didn’t want to shoulder the responsibility because I didn’t think I was capable of creating a likable, memorable, and functional character. What followed were weeks of ups and downs. Frustration, excitement, spurts of creativity, anxiety, and lots of iteration. When designing Chip, we prioritized three things: cuteness, functionality, and memorability. First and foremost, he had to have a blocky head which could pivot to deflect balls. To speak to the intuitiveness and simplicity of our mechanics and gameplay, we also designed Chip using basic shapes and primary colors. No character is perfect, but I think we’re finally at a point where we’re all satisfied with Chip’s design. Chip’s colors are warm and approachable, and his form communicates function. And thus, we’re finally ready to unveil the making of...
by Annie | Game Design
We’re nearing the end of the second week of production, and every day brings more exciting new design challenges. Adrenaline and stress levels are running high as we continue to crank through 12-hour days on coffee and instant noodles. Because we’re so close to our game, constantly nitpicking over every gameplay detail and art asset, it’s sometimes difficult to see the bigger picture. So many variables are up in the air, and we have the awesome yet often terrifying opportunity and responsibility to craft this concept into a fun and memorable game. And that’s why zooming out is so important. Twice a week, instructors and industry mentors come in to check on our progress and offer invaluable guidance, allowing us to take a step back and evaluate our game, to see it for its triumphs and challenges, and to ensure that our efforts and decisions are in line with the vision and goals of our game. To all our instructors and mentors, thank you, thank you, thank you. Your honesty and advice continually push us to new heights as designers. Our game is already infinitely better than it could’ve been without...
by Annie | Game Design, Illustration Station
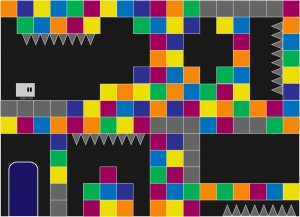
Creating art that effectively communicates gameplay is hard. Not only must functionality and aesthetics work hand in hand, but the visual style must be strong enough to withstand round after round of iteration on game mechanics. Early in preproduction, we knew we had a strong mechanic: a character that throws balls and deflects them with his head to break blocks. However, everyone on the team and everyone we pitched the concept to imagined the game differently. Thus, the art went through several iterations to get to its current state, and certain aspects of the visual style are still undergoing further iteration. One of the earliest art mockups consisted of a small blockheaded character surrounded by blocks and environmental hazards on a single screen. We soon realized that our character needed to communicate more movement, and that perhaps gameplay would extend beyond a single screen. With this mockup, we started to get a sense of the environment around the gameplay. After some experimentation, we created a more whimsical concept, this time with a bolder look and a more memorable character. After further discussions on art and gameplay, we settled on a construction theme, providing more cohesion amongst the elements of the environment. Our current art style aims to communicate both gameplay and function through bold visuals and purposeful design with careful consideration in guiding the player experience. As the mechanics undergo further iteration and tweaking, the art will surely receive further iteration and polish as well. However, by going through multiple rounds of iteration on the visuals and continually going back to the drawing board to push strong visual communication, we’ve...
by Annie | Game Design
One of my favorite questions to ask people is what a day in their shoes looks like. And it occurred to me that people might be curious what a day in the life of a game design student looks like, so here goes. First, the disclaimer: of course, there’s no typical day. I’m currently in term 5 of 6, so my team and I are in the midst of production for our final game projects. Thus, our schedule these days consists largely of production tasks rather than classes. What follows is a conglomeration of bits and pieces from the past week, summed up in a single day. 8am Snooze a few times, then get out of bed. Walk the dog. Read news and game blogs while eating breakfast. Start some preliminary research on design/programming issues for the day. 10am Brainstorm design/programming solutions on the bus ride downtown. 11am Stand-up meeting. All team members stand up and share what they worked on yesterday, what they plan to work on today, and quickly bring up any issues they’re having. 11:05am Start working on the game. This week, I’ve mostly been working on programming the main mechanics and features of our game, like character movement, collision issues, implementing our main mechanic, integrating art, and putting in some basic user interface elements. 1pm Project development class. Instructors check on each team’s progress, helping out where they can and pushing us to make the best design decisions possible. 4pm Work with teammates on different design/programming issues. 5pm Street Fighter. I’ll be the first to admit that I’m not a great programmer. My brain can...
by Annie | Game Design
Today marks the second day of production for our final game projects, and as of today, we have exactly 80 days to complete our game. Yikes. Needless to say, things are ramping up quickly. If you’re interested, you can follow our game dev progress at http://blokheadgames.com More updates to come. Stay...
by Annie | Game Design, Illustration Station
When you’re up late working until 3am and can’t wait to wake up to keep working, you know you’re in the right business. For me, that’s the business of making games. The past couple of weeks have been extremely hectic, to say the least. Juggling the many aspects of preproduction can be quite difficult, especially when there are also several classes crowding your plate. In the past few weeks, I’ve produced countless art assets and taken them through multiple iterations, created diagrams showing the specifics of our gameplay mechanics, and prototyped many of the main mechanics in our game while learning the ins and outs of Unity, all while simultaneously working on a Flash game as well. It makes me tired just thinking about all that work, but I enjoyed every moment of it. And like all hard work in games, I think I deserve an achievement or two, perhaps these: 1. Seeing Ai to Ai With all the vector art I’ve created in the past few weeks, I now know Adobe Illustrator (Ai) better than I ever have. Ai and I, we’re tight. 2. Off on a Tangent Programming brings back all those memories of high school geometry. So first and foremost, a special thanks to Mrs. Jones for making me memorize soh-cah-toa (sine = opposite over hypotenuse, cosine = adjacent over hypotenuse, and tangent = opposite over adjacent). And thank you, Joe, for helping me remember what all that meant. 3. Design on a Dime Everyone loves free stuff. To fill up two buy-six-coffees-get-one-free cards in a single week? Pure heaven. 4. Pitchin’ In I can’t remember...
by Annie | Game Design, Illustration Station
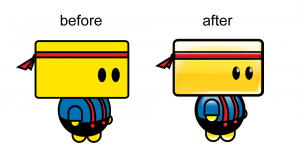
Thanks to everyone for your prompt and constructive feedback on Chip and the art in our game so far. I’m working through the feedback bit by bit, but I thought I’d give you a sneak peek into Chip’s makeover. Many of you pointed out that Chip seemed flat and didn’t blend in with the environment around him, and we totally agree. We’re still working on his proportions and body shape, but here are a couple of updated images. Updated environment images are still in the works. Keep the feedback...
by Annie | Game Design, Illustration Station
As I’ve been mentioning again and again in my blog lately, we’ve been working very hard on our final game project concepts. And at this point, we’re ready to introduce the world to Chip, the protagonist in our game. In the image above, Chip is the yellow blockheaded guy on the left. The concept and mechanics are still being hammered out, but we need all the feedback we can get. Whether or not you’re an artist or game designer, we want to hear from you. How does Chip look? How does the environment look? What do you think of the colors, shapes, lines, spacing, style, etc.? What stands out? What caught your eye first? We realize the importance of the look and feel of a game in attracting and maintaining players, so we’d love any and all feedback. Please comment below or send me your thoughts....
by Annie | Game Design
I was up late last night. Doing what? Programming in my PJs, of course. I proceeded to dream about design docs and prototyping and was out of bed before my alarm clock went off. You see, we’re in the midst of preproduction for our final game projects, which means mountains of design docs, multiple prototypes, and countless brainstorming sessions. Oftentimes with game projects, my interest starts to wane after brainstorming the initial game concept and hammering out the mechanics. This time around though, with the challenge of creating a full game in just a handful of weeks, the pressure is on, and I’m loving every moment of it. I can’t think of anything I’d rather be doing than designing games. Back when I first created my website, I wrote that I breathe design. And it’s true. Game design is pumping through my veins. This is the stuff dreams are made...
by Annie | Game Design
Learning a new program can be both exciting and stressful. For our final game project, we’ve decided to use the Unity game development engine. Unity allows us the flexibility to use prefabs and object oriented programming that will be especially useful for the mechanics in our game. While programming logic is easily transferrable from one programming language to another, the nuances and syntax can take a bit to get used to. Here’s one developer’s account of getting started with Unity:...
by Annie | Game Design
Last week, our class took a field trip. When you take a field trip in a game design course, where do you go? Why, to Electronic Arts, of course. EA Canada is right around the corner in Burnaby, BC, just a hop, skip, and a jump outside of Vancouver. After spending time filling out forms and playing around with some super fancy swivel chairs in one of the EA meeting rooms, we were escorted around the premises by EA employees. In game design, you’ve got to work hard AND play hard, and at EA, it shows. The facility includes a soccer field, basketball court, state of the art gym, library stocked with games and movies, and fancy coffee machines on every floor. Not a bad place to...